Image
Top
Navigation

Furry Fanny Pack

An awesome fanny pack, to give me easy access to coins and notes on market day.

I’ve been wanting one of these for a while now, any time I sell anything. So, the other day I set to it and had it finished in less than a day.

It has rabbit fur exterior, leather bottom and straps, and fabric interior. There’s a zippered pocket for a phone and big notes, a couple of flat, open pockets for the notes you want accessible, and a large central pocket for coins (or whatever). I used it the other day with great success.

As a prototype, there are some things I would change (like making it slightly larger), so I’ll include the improvements in the article. You can also use the principles of the fanny pack to make a handbag instead.

For those of you with ethical questions regarding the fur, we raise rabbits as our family’s source of meat. We tan the pelts because the fur is gorgeous and the leather is soft, and because they would otherwise be thrown away. Click on these links if you’re interested in knowing more about raising rabbits, tanning your own rabbit fur, making a fur hat or a furry foot-warmer. 
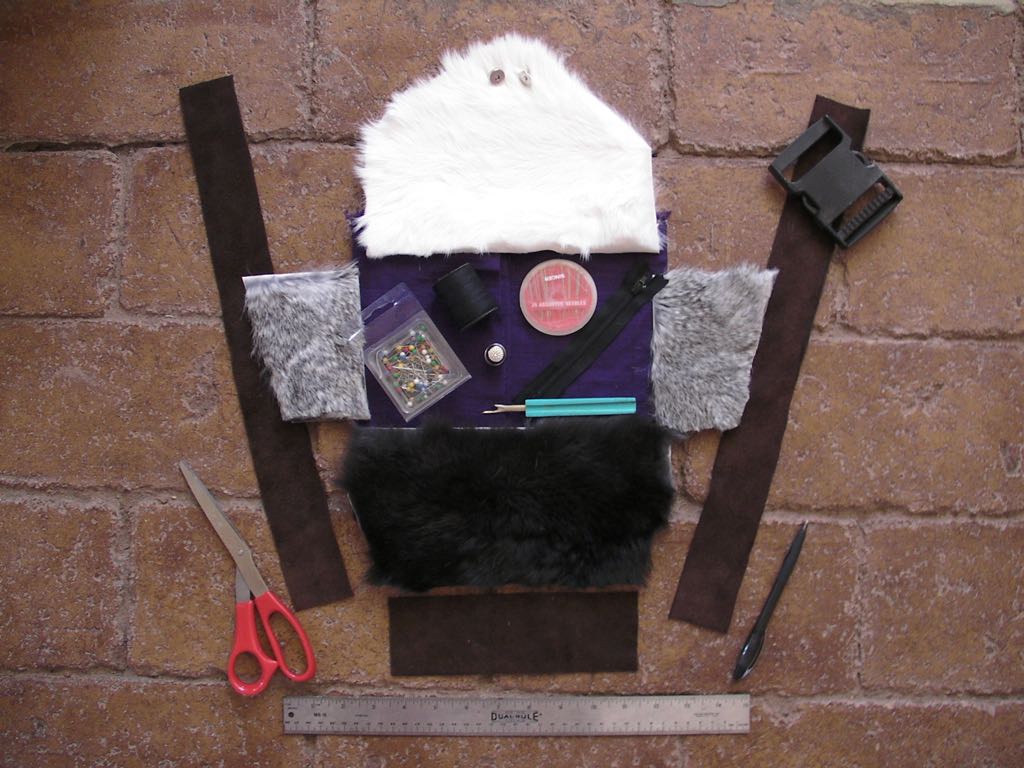
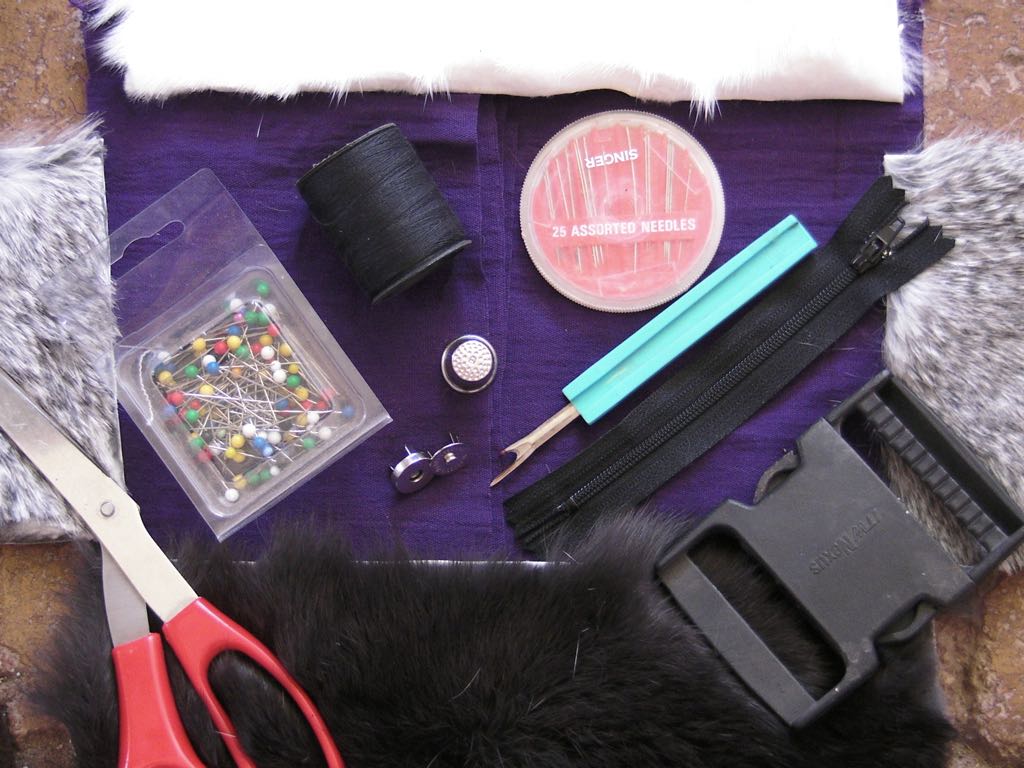
Materials & Tools
fanypack-materials1
fanypack-materials2
Materials

3 rabbit furs

Pliable leather (like suede) – enough for 2 straps (2″ by 36″ total) and the base (3″ by 8″)

Fabric (less than 20″ of a yard wide material)

Zip (up to 7″)

Magnetic button clasp

Push-in fastener (to fit the width you want your straps to be)

Tools

Tape measure

Marker

Scissors

Needle and thread

Sewing machine (if you have it)

Pins

Thimble


Step 1: Cutting panels

EXTERIOR

[Note: when you are cutting the fur, make sure the grain of the hairs are all heading in the desired direction, not one pointing up and another pointing down.]
  1. Out of fabric (I used denim for this piece as it must be strong and isn’t visible), mark and cut one isosceles trapezoid with the top parallel line measuring 10″ and the bottom parallel line measuring 8″. The distance between the two should be 6″ (I made mine 5″ tall, but an extra inch would be better). This is the back panel (against the stomach) and will now be called “Ext. Back”.
  2. Place one of your furs hair side down. Mark and cut an isosceles trapezoid of the same dimensions as “Ext. Back”. This panel is “Ext. Front”.
  3. Out of another piece of fur, mark and cut two right-angled trapezoids. For the first, start in top right-hand corner (with the fur down), go left 5″, down 6″, right 3″ and then finish off the shape with a diagonal line. This is “Ext. Left”. For the second, start at left-hand corner (with fur down), go right 5″, down 6″, left 3″ and then finish off the shape with a diagonal line. This is “Ext. Right”.
  4. Using the suede-like leather (mine was from a local cattle man), cut two strips, the width and length of your straps. I made each of mine 2″ wide (but you can reduce that a little if you want) and 18″ long (that length depends on waist plus overlaps and such – if you’re unsure, cut them longer to be on the safe side and then you can trim off excess).
  5. Also with the suede, cut a piece that is 3″ by 8″. This is “Ext. Bottom”.
  6. With the last fur, you’re going to make the top, or “Lid”. I made mine even with the bag on the top, then angled down to a point halfway down the front of the bag. To do this you will need to have the top rectangle part 10″ by 4.5″ with an isosceles triangle underneath it, whose base shares a 10″ side with the rectangle and whose height is 4″. Look at the picture of the white fur if this seems confusing. If you want the lid to have sides as well, cut two 5″ by 2″ pieces (with a little extra triangle on one side to match the line of the lid) – I didn’t do this, but it would be more secure, so will give instructions.

INTERIOR

I use a fabric for the whole interior as it is much easier to sew zippers and pockets out of fabric than out of fur. Make sure you use something fairly stiff that doesn’t fray too much. I didn’t and it made it a little harder, as I had to double up each hem without having allowed for it in my measurements (an extra 1/4″ besides the usual 1/4″ hem).

  1. Mark and cut two pieces the same as “Ext. Back”. These will be “Int. Back” and “Int. Front”.
  2. Mark and cut two pieces the same as “Ext. Left and Right”, which will be “Int. Left and Right”.
  3. Mark and cut one piece the same as “Ext. Bottom”, which will be “Int. Bottom”.
  4. Mark and cut a 10″ by 10″ square. This is the notes pocket
  5. Mark and cut a 8″ by 10″ pieces of fabric. This will be a zippered pocket.


Step 2: Pockets

Notes Pocket

  1. Take the 10″ by 10″ piece of fabric, and hem the top and bottom.
  2. Fold it almost in half, with the front about 1/2″ lower than the back.
  3. Turn the sides under and pin the panel to the good side of “Interior Back”.
  4. Sew the two together along the sides and bottom. Leave the top un-sewn, so that you have two pockets for notes.

Zippered pocket

  1. Take the 8″ by 10″ pieces of fabric. Pin one half of a 7″ zipper to the top of the fabric (8″) and pin the other half to the bottom. Fold it in half and check that the zipper works (that you have the zippers pinned on to the right side of the fabric and in the right direction). Sew them in place.
  2. With the zipper closed, fold the sides under and pin the panel to the good side of “Interior Front”.
  3. Sew the two together along the sides and bottom. Leave the top un-sewn, so that you have a hidden pocket behind the zippered part.
  4. If you want any other features in your fanny pack, add them to the interior panels now. You can put in more pockets, elastic to hold pens or lip balm, key ring clip, etc.
  5. Make sure that all loose threads are pulled to the back of the fabric and knotted. There should be no threads visible on the good side.


Step 3: Straps
  1. Sew one end of one strap to the bad side of “Ext. Back”. It wants to be 1/4″ – 1/2″ below the top of the fabric and about 2″ into it. This will be holding the weight of the fanny pack, so stitch it well.
  2. Do the same for the other strap. [Note that I forget to do this, so I had to sew my straps on to the outside of the fanny pack, which is fine as they’re not visible when wearing it. Still ,this is the better way to do it.]
  3. Place the opposite end of one strap through the “closed” part of the push-in fastener and sew it to itself.
  4. The other part of the push-in fastener gets pushed in and looped back on itself. It will not be sewn, so that you can adjust it to your waist.


Step 4: Assemble exterior
  1. Place the “Ext. Back” on your work surface, with the good side of the fabric facing up (straps down).
  2. Put the “Lid” fur on top of it, with the fur facing down. Then put the “Int. Back” on top of the leather part of the fur, with the good side (with pocket) facing down. Sew the three together along the top, leaving 1/4″ un-sewn at either end.
  3. Make a mark on the leather part of the “Lid”, 1″ up from the bottom of the triangle part, in the center. Line up the male part of the magnetic button clasp with this mark.
  4. With a knife, make two very small incisions and push the metal tabs of the clasp through them (from the leather side through to the fur). Push the metal tabs back and away from each other until they lie flat against the fur. Cover them up with fur.
  5. Take the “Ext. Front” panel and make a mark 3.25″ down from the top, in the center. Line up the female part of the magnetic clasp and make two very small incisions with a knife.
  6. Push the tabs through from the fur side to the leather. Push the tabs away from each other until they are tight against the leather.
  7. Place “Ext. Front” on your work surface, fur up. Put “Int. Front” on top of it, with the pocket down against the fur. Sew them together along the top, leaving 1/4″ un-sewn at either end.
  8. Do the same for the two left-hand sides (fur and fabric) and the two right-hand sides (fur and fabric).
  9. Put the two back panels (and the lid) on your work surface with the interior fabric and lid up and out of the way, and the “bad” side of the exterior face down. Fold the straps to the front.
  10. Place the straight side of left-hand piece of fur on top of the back panel. Make sure the fur is face down and the fabric is up and out of the way. Sew the two together, sewing through the strap.
  11. Place the straight side of the right-fur piece of fur on top of the back panel, fur down and fabric out of the way. Sew them together through the strap.
  12. You can sew the side pieces of the lid into this seam as well. However, that may make it too thick to sew through. Alternatively, you can sew them into the strap and then to the lid at the end.
  13. Now sew the front fur panel to the sides. Make sure the fur of both pieces are touching so that it’s the leather you’re looking at when you sew.
  14. Sew the “Ext. Bottom” to the bottom of all four exterior panels (front, back and sides). The fur and good side of the leather base piece are all on the inside at this point.
  15. Turn the bag inside out. The fur should now be visible all the way around with the straps extending outwards. This part’s finished. Now for the fabric interior, which at this point should all by up and out of the bag.


Step 5: Sewing interior
  1. Fold the edges of each piece of fabric back on itself and sew it to its neighbor (so that the hems are hidden).
  2. Do this for all four pieces of fabric – the front, back and sides.
  3. Then tuck the edges of the “Int. Bottom” under and sew it to the bottom of the four panels.
  4. Push the completed interior bag inside its fur exterior.
  5. Close the lid. If you want to put sides on the lid, do so. If not, you’re done!