Image
Top
Navigation

Bait Hive

Catch a swarm by making a simple bait hive and lure to attract some local bees.

Getting honey from your Honey Cow requires you to have bees in your hive. Using a “bait hive” and some “bee lure”, we will “fish” for a swarm of bees to fill our Honey Cow.

Bees tend to swarm during the big nectar flows in late spring, early summer. You should have your bait hives set up well ahead of time. In some areas, people are able to catch a few swarms per year. It helps to have more than one bait hive to increase your chances. These simple hives provide an attractive home for the new swarm.

The simple bait hive we describe here is designed to fit with a Honey Cow hive. The top bars are interchangeable, so moving your new bees to the Honey Cow is quick and easy. Like with fishing, you must be patient and wait. Before you know it, you’ll have happy bees ready to join your family.

Materials & Tools
baithive-materials
Materials

1X10 by 8 ft non treated lumber (cedar or pine work well)

24 X 1 1/2” wood screws

10 X 3/4” wood screws

A bit of white paint

Boiled Linseed Oil or natural wood preservative (optional)

2 X 11” by 3” pieces of sheet metal

1” cube of Beeswax

1/4 cup olive oil

Lemongrass Oil (100% natural/organic)

Tools

Cordless Drill

Circular Saw

1/4” drill bit

3/4” drill bit

Wood rasp/ file

Straight Edge

Paint brush

Fluorescent Marker (Yellow Highlighter)

Small glass jar and lid

Small saucepan

Stove


Step 1: Bait hive
  1. This simple hive uses top bars from your Honey Cow, for easy transfers in the future. We use 6 top bars, for an interior width of approximately 8 1/2”. This interior width may vary according to the exact width of your top bars. Start by measuring the total width of 6 top bars. If they are more than 8 1/2” in total width, use 5 top bars instead. This measurement will affect the length of the sides and bottom. In this version, the sides and bottom pieces are 10 1/2” long (8 1/2” plus 2 inches for the thickness of the lumber).
  2. baithive-1.2a
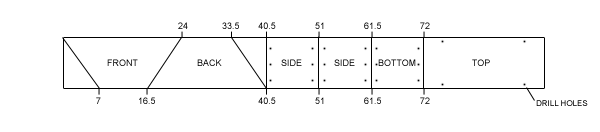
Start by marking one side of a 1X10 by 8 foot piece of lumber as follows, 24”, 33 1/2”, 40 1/2”, 51”, 61 1/2”, 72”. On the opposite side of the board, mark as follows: 7”, 16 1/2”, 40 1/2”, 51”, 61 1/2”, 72”. Draw lines between the marks, to create your cutting template. Using a circular saw, cut the board. [see diagram]
  3. On the cut edges of the side and bottoms boards, drill 3 holes along each side (6 total per board). Make the hole about 1/2” from the cut edge. For the top, drill 4 holes, 2 on each side on the factory (uncut) edge.
  4. On a flat surface, place the front and back boards with the 24” edge down, so that the boards are upside down. There should be a 8 1/2” – 8 3/4” space between the boards. Lay the bottom board in place on top of the front and back boards, and screw in place, carefully keeping the face boards square. Test the width of your bait hive by placing your top bars in between the face boards. They should fit easily, but not have any spaces between the top bars. Now, screw in each side board, carefully keeping the width of your box consistent.
  5. Once everything is screwed together, use a 3/4” drill bit to make an entrance hole on the bottom of one of the sides. Round the edges of the hole a bit to give a nice, funnel – like opening.
  6. You can weather proof the outside of your hive with a natural preservative, like boiled linseed oil and beeswax. Try to avoid chemical preservatives, as they will add a smell to the hive that might repel the bees. The preservative is optional, and in my climate, there is really no need.
  7. Paint around the opening of the hive with just a bit of white paint. Once this paint is dry, add some lines and decorations around the opening with your yellow highlighter. Bees can see fluorescent colors very well, and having a contrasting color around the entrance will make it easier for the swarm scouts to find the front door.
  8. Put your top bars in your hive. Attach the pieces of sheet metal on each side to prevent the top bars from moving or shifting.
Step 2: Bait lure
  1. Place your small glass jar in your saucepan, and raise it about 1″ off the bottom of the pan on a metal rack or something similar. Put some water in the saucepan, up to about halfway on the jar.
  2. Put the saucepan on the stove and slowly heat the water. You don’t want it boiling, just simmering. When the water is simmering, place the 1/4 cup of olive oil and the 1″ cube of beeswax in the glass jar. It helps if you cut the beeswax into smaller pieces. Stir constantly.
  3. Once the wax is melted, turn off the heat. Place about 15-20 drops of lemongrass oil in the wax/olive oil mixture, and stir well. Take the glass jar out of the water and allow to cool. Once cool, this makes a great “bee lure” for attracting your bees.
  4. Rub a bit of the bee lure on each top bar in your bait hive, and a bit around the entrance. You don’t need much, just a dab.


Step 3: Setting the trap

Setting up your bait hive is the most important step. Experience shows us that you can improve your chances of catching a swarm if you do the following:

Situate a hive in a good bee location, one that has water, plenty of flowers, and is not disturbed by humans.

Place the hive between 8 and 15 feet high. Putting the hive in a tree or on a roof works well.

The hive should not be in full, direct sunlight, but a bit of broken shade works well.

Face the entrance of the hive towards the sun, being South in the Northern Hemisphere, and North in the Southern Hemisphere.

If you have a bit of old brood comb, it is good to place this in your bait hive as well.

Increase your chances of catching a swarm by making several bait hives, and placing them around your area.

Once you set your hive, leave it alone for 2-3 weeks. When you go check on your hive, just look at it from a distance, try not to handle it very much. You can add more bee lure every once in a while, like every month or so.


Step 4: Transfering hive

If you’re lucky, one day you will check on your hive and you will see bees flying in and out of the entrance. Leave the hive for another week, and then visit it after sundown. No bees should be leaving the hive at this time of the day. It is important to wear protective clothing while handling and transferring the hive.

  1. Place a bit of rag or cotton in the entrance. You want to block the entrance really well, so that no bees can enter or leave. Carefully transport the hive to your Honey Cow. For now, just set the hive next to the honey cow.
  2. In the morning, suit up again, and start your smoker. Make room in your honey cow for the 6 new top bars. You should place them in the middle of the hive, at least 5 or 6 bars from the entrance. When you move in the new bars, keep them in the same order.
  3. Puff a bit of smoke towards the bait hive. Carefully remove the roof and puff a bit more smoke over the top of the top bars. Starting at one end, remove a top bar and carefully lift it straight out and quickly place it in the Honey Cow. Move the second bar the same way, carefully and quickly.
  4. Once all of the bars have been moved to the Honey Cow, take out 6 bars at the back of the Honey Cow. Quickly lift the bait box and place it upside down on the Honey Cow. When you place it down, bump it quickly to drop the bees out.
  5. Leave everything alone for 30 minutes or so to give the bees a chance to move into the new space. Go back to the Honey Cow and remove the bait hive. If there are still a lot of bees in the bait hive, quickly hit it once or twice against the top of the Honey Cow to knock the bees down into the new hive. Using a bee brush or a leafy branch from a tree, brush the remaining bees into the Honey Cow.
  6. Replace the missing top bars in the Honey Cow and put on the roof. Remove the bait hive, and put it in your house or another area where bees can’t get to it. Leave the hive alone for a while, at least 2 weeks. Check on the hive periodically to see the bees entering and leaving. If all is well, 2-3 weeks after the transfer, you can open the Honey Cow and check on your bees. They should be starting to enlarge the new combs and possibly building new combs. You have successfully captured and transferred a swarm!