

We actually started working on this tank last year, intending to fill it with the overflow from our house system. However, when the annual rain season didn’t come, we stopped construction. We didn’t want to have the tank lying empty through the windy seasons of Fall and Spring. Now that this year’s rain season is upon us, we have started it up again.
This tank design is very cheap and fast. This tank has cost us a total of $1,000 (including roof materials). We have already seen ways to improve on it, which we will implement on another tank for the house system. This is what we have done on this tank, so far:
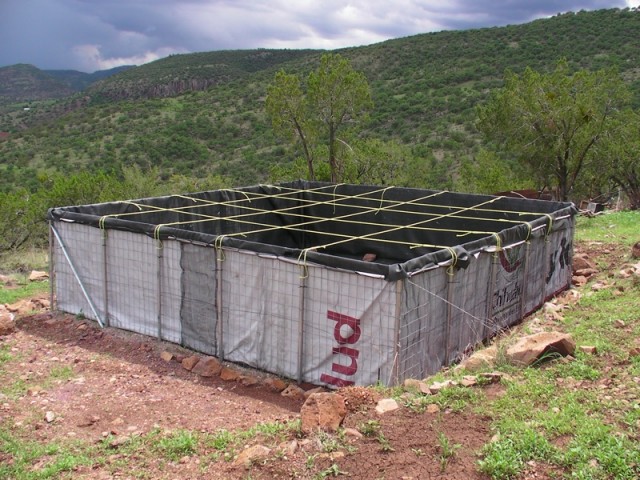
[flickr_set id=”72157627618065336″] 1. Level the site and compact the soil.2. Add a layer of screened sand, and compact it well.
3. Drive posts into the ground around the perimeter of the tank, spaced about 2.5 ft apart. The layout of this tank is 15 ft wide, 16 ft long.
4. Attach a welded wire mesh (galvanized) to the posts. Make sure any sharp tie wires face the outside of the fence. The horizontal wires of the mesh must be placed on the outside. The mesh is 4 ft tall.
5. Inside the tank area, attach a vinyl tarp and then pond liner under-layer to the fence. We simple folded these fabrics over the top of the fence and held them in place with clothes pegs.
6. Fold your tank liner in a way that will be easy to unfold inside the tank, and then attach it to the fence. Allow a little sag in your walls. Our fish safe pond liner was 25 ft by 25 ft, so we folded the ends toward the center, at 4.5 ft on two sides, and 5 ft on the remaining sides. Then, we rolled the liner up so that it is easy to unfold inside the wire cage.

7. Each of these layers should have at least 6″ extra on the outside of the fence. To hold things in place, we used scrap pieces of 1/2″ PVC pipe, wired them to the metal mesh, and “clamped” the liner and under-layer to the sides. This holds the liner in place.
8. At the lowest point in the floor of the tank, put an outlet. We used a 1 1/2″ bulkhead fitting.
9. Tie thick (3/8″), water-proof rope from each post to the one opposite it. You want to pull it tight, so that the posts lean in ever so slightly, as the weight of the water will stretch the rope and push out.
If you plan to use the tank for fish and/or irrigation, you will not need a roof. Just make sure you have a few minnows or other insect-eating fish in there to keep the mosquitoes under control. Put an overflow in (3-4″ bulkhead), fill it up and add fish.
We have several more steps to do and will keep you posted on our progress. We’ll also write a proper how-to at a later date, including improvements to the design.


Submit a Comment